


angular/material2でフォームを作る
angular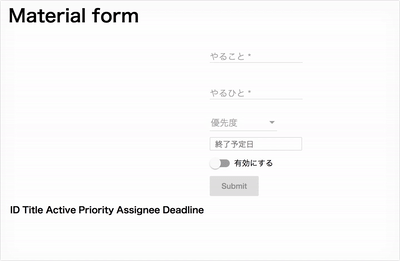
angular/material2の準備
現時点で DatePickerや Tableなど 開発中のコンポーネントが多いため足りないものを他のライブラリで補うなどする必要がある。 DatePickerはもう少しで出そう。
$ npm install --save @angular/material
$ npm install --save hammerjs # gesture用
$ npm install --save @angular/animations
Moduleでimport 'hammerjs';して、以下のModuleをimportに加える。
BrowserAnimationsModule(from '@angular/platform-browser/animations')MdButtonModuleなど使うもの(from '@angular/material')
スタイルとアイコン(md-icon)を追加。
<link href="../node_modules/@angular/material/prebuilt-themes/indigo-pink.css" rel="stylesheet">
<link href="https://fonts.googleapis.com/icon?family=Material+Icons" rel="stylesheet">
フォームを作る
とりあえずコンポーネントを作成。
$ ng g component TodoForm
Formの値をバインドするためのクラスを作成する。
export class TodoForm {
  constructor(
    public id: number,
    public title: string,
    public active: boolean,
    public priority?: number,
  ) {  }
}
まずはmaterial2のmdInput, mdSelect, mdButtonでフォームを作る。
#todoFormのように頭についている#は
reference variableで、
titleはrequiredとしている。
<div class="root">
  <form (ngSubmit)="onSubmit()" #todoForm="ngForm">

    <div *ngIf="model.id !== 0" class="form-item">
      ID: {{model.id}}
    </div>

    <div class="form-item">
      <md-input-container>
        <input mdInput name="title" required placeholder="やること"
          [(ngModel)]="model.title">
      </md-input-container>
    </div>

    <div class="form-item">
      <md-select placeholder="優先度" name="priority"
        [(ngModel)]="model.priority">
        <md-option [value]="1">高</md-option>
        <md-option [value]="2">中</md-option>
        <md-option [value]="3">低</md-option>
      </md-select>
    </div>

    <div class="form-item">
      <md-slide-toggle name="active" [(ngModel)]="model.active">
        有効にする
      </md-slide-toggle>
    </div>

    <div class="form-item">
      <button type="submit" md-raised-button [disabled]="!todoForm.form.valid">
        Submit
      </button>
    </div>

  </form>
</div>

<table>
  <thead>
    <tr>
      <th>ID</th>
      <th>Title</th>
      <th>Active</th>
      <th>Priority</th>
  </thead>
  <tbody>
    <tr li *ngFor="let todo of todos">
      <td>{{todo.id}}</td>
      <td>{{todo.title}}</td>
      <td>{{todo.active}}</td>
      <td>{{todo.priority}}</td>
      <td><button md-button (click)="onEdit(todo.id)">編集</button></td>
    </tr>
  </tbody>
</table>
コンポーネントはこんな感じ。
@Component({
  selector: 'app-todo-form',
  templateUrl: './todo-form.component.html',
  styleUrls: ['./todo-form.component.css']
})
export class TodoFormComponent implements OnInit {

  constructor() { }

  todos: TodoForm[] = [];
  model = new TodoForm(0, "", false);

  ngOnInit() {
  }

  onSubmit() {
    if(this.model.id === 0) {
      this.model.id = this.todos.length + 1;
      this.todos.push(this.model);
    }else{
      this.todos[this.model.id - 1] = this.model;
    }
    this.model = new TodoForm(0, "", false);
  }

  onEdit(id: number) {
    this.model = Object.assign({}, this.todos[id - 1]);
  }
}
AutoComplete
次に人を登録するためのtextフォームを作る。これは前もって登録されている人の中からAutoCompleteさせる。
mdAutocompleteに候補を渡してmdInputのmdAutoCompleteにmdAutoCompleteの参照を渡す。
FormControlを扱うためには@angular/formsのReactiveFormsModuleをimportする必要がある。
<div class="form-item">
    <md-input-container>
      <input mdInput name="assignee" required placeholder="やるひと"
        [(ngModel)]="model.assignee"
        [mdAutocomplete]="autoAssignee"
        [formControl]="assigneeFormControl"
      >
    </md-input-container>

    <md-autocomplete #autoAssignee="mdAutocomplete" [displayWith]="displayAssignee">
      <md-option *ngFor="let p of filteredAssignee | async" [value]="p">
          {{ p.name }}
      </md-option>
    </md-autocomplete>
  </div>

  <div class="form-item">
    <md-select placeholder="優先度" name="priority"
      [(ngModel)]="model.priority">
      <md-option [value]="1">高</md-option>
      <md-option [value]="2">中</md-option>
      <md-option [value]="3">低</md-option>
    </md-select>
  </div>
</div>
people: Person[] = [
  {id: 1, name: "taro"},
  {id: 2, name: "jiro"},
  {id: 3, name: "ichiro"}
];
assigneeFormControl = new FormControl();
filteredAssignee: Observable<Person[]>;

ngOnInit() {
  this.filteredAssignee = this.assigneeFormControl.valueChanges
        .startWith(null)
        .map(val => val ? this.assigneeFilter(val) : this.people.slice());

  this.assigneeFormControl.asyncValidator
}

assigneeFilter(val: string): Person[] {
  return this.people.filter(p => new RegExp(`^${val}`, 'gi').test(p.name));
}

displayAssignee(person: Person): string {
  return person ? person.name : '';
}

export class TodoForm {
  constructor(
    public id: number,
    public title: string,
    public active: boolean,
    public priority?: number,
    public assignee?: Person,
  ) {  }
}

interface Person { id: number, name: string };
DatePicker
最後に目標日を設定するためにDatePickerを用意する。 上にも書いた通り、material2にはまだDatepickerがないので他のライブラリで代用する。 今回はAngular v4に対応していて見た目がシンプルなkoleary94/Angular-2-Datepickerを使った。
$ npm install --save angular2-material-datepicker
<div class="form-item">
  <material-datepicker placeholder="終了予定日" [(date)]="model.deadline"></material-datepicker>
</div>